This post is part of a series we wrote after wrapping up the IRIS project.
Design notes part 1: Digital impacting Physical
When building a mixed-reality setup, the digital components impose some limits on the physical aspects. Ideally, you would like to move all components to the realm (digital/physical) in which they are the easiest and/or most effective to implement, but due to the restrictions of technologies this is not always possible. Here are some examples of how the technologies we used impacted our design choices.
Pepper’s Ghost screens
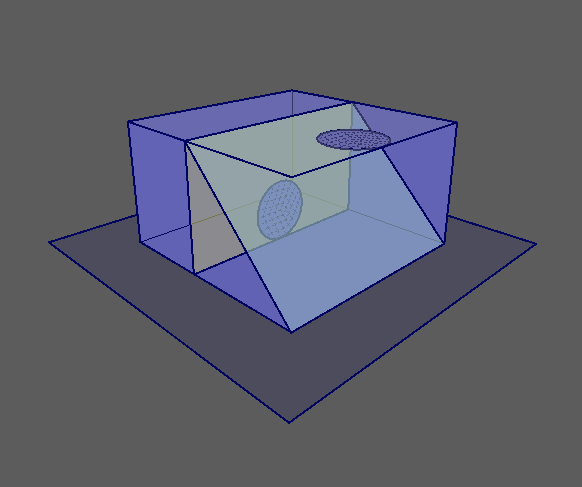
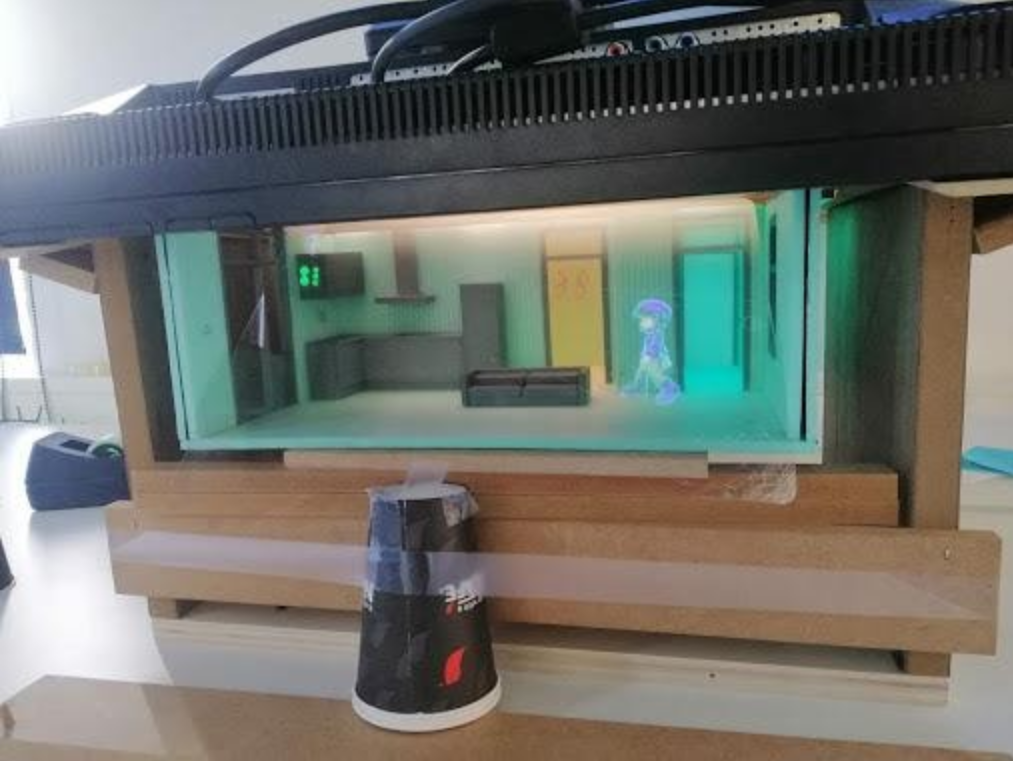
The technology has to work effectively in the box you design. As the Pepper’s Ghost effect works with a 45-degree-angled screen, this screen needs to fit the apartment and its furniture. Furthermore, the effect works best when viewed from the front. Although it has a reasonable viewing angle, it will not work at all when viewed from the sides as you will look onto the edge of the screen. This way, the box needs to be built ‘peep box style’, with only visibility from the direct front.
Most practical, the size of the box is determined by the size of the screen you use for projecting the Pepper’s Ghost. In our case we went for a 15,6“ screen, which meant the effective width of the play area inside the box could be no wider than 34,4 cm.
Lighting
During development we found that lighting can be done both through the digital layer and the physical layer. Atmospheric lighting can be generated by the laptop screen, but also by LEDs in the box. However, too many lights within the box will wash out the visibility of the digital layer.
The box also needs to prevent too much ambient light to flood in from outside the box, as this will reduce visibility as well. In order to do so, we designed the physical box so it is fully enclosed form all sides except the front from where the players look inside. All the lights inside the box are precisely dimmed so that even when they simulate daylight conditions, they are bright enough to light the scene, yet they are dim enough not the wash out the peppers ghost effect. This part took some trial and error to figure out.
Even with these precautions, the effect works best when you avoid any light from coming into the box from behind the player. Therefore the front of the box should not face windows or lamps as this could result in reflections on the screen, spoiling the effect.
This post is part of a series we wrote after wrapping up the IRIS project.
Design notes part 2: Physical impacting Digital
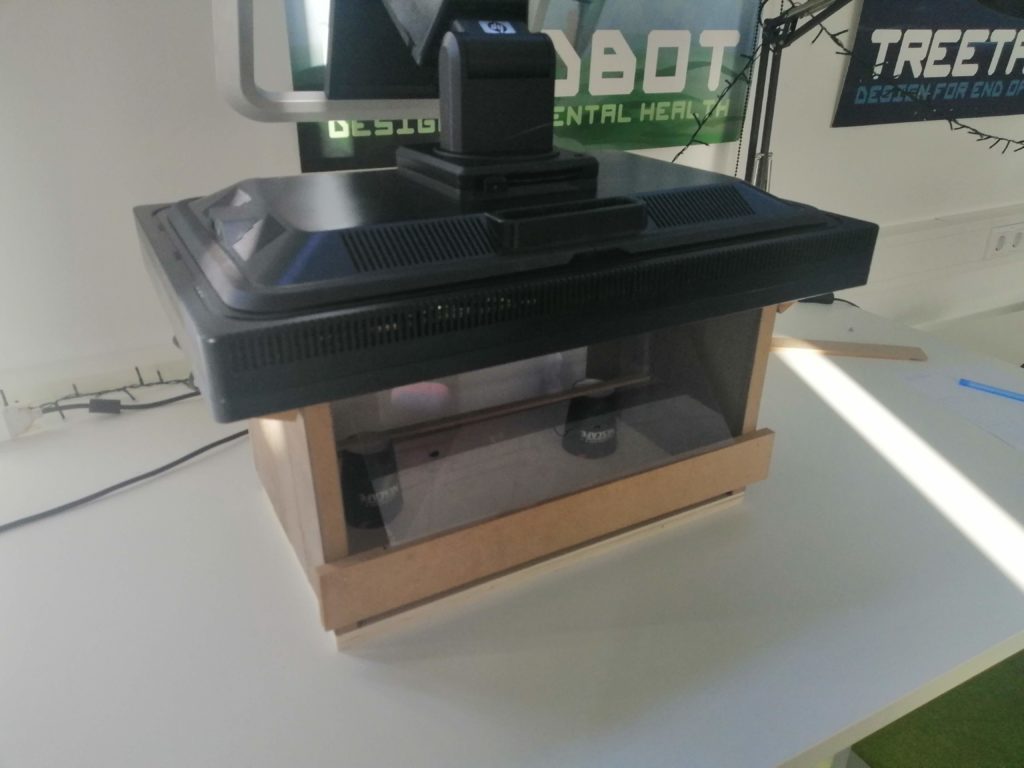
Even before the lockdown measures, the design of the apartment was done digitally to help with rapid prototyping. The designs were then translated to physical form either through model-building techniques or 3D printing. Digitally modelling the physical box meant we could quickly estimate the proportions of the physical box, without having to fully build it first.
The box was built in such a way that all the electronics could be fitted inside the box’ cavities without laying a finger on any material. Besides being a really rapid way of prototyping and conducting ‘form studies’ it also is a great way to save material otherwise spent on making different iterations of the box in real life. Sidenote: it’s a fun fact that prototyping in the physical realm often saves time when building a digital solution or game. In this case it were the digital tools that provided us with quick ways to test our assumptions and prototype ideas before spending time on the physical building process.
The Apartment
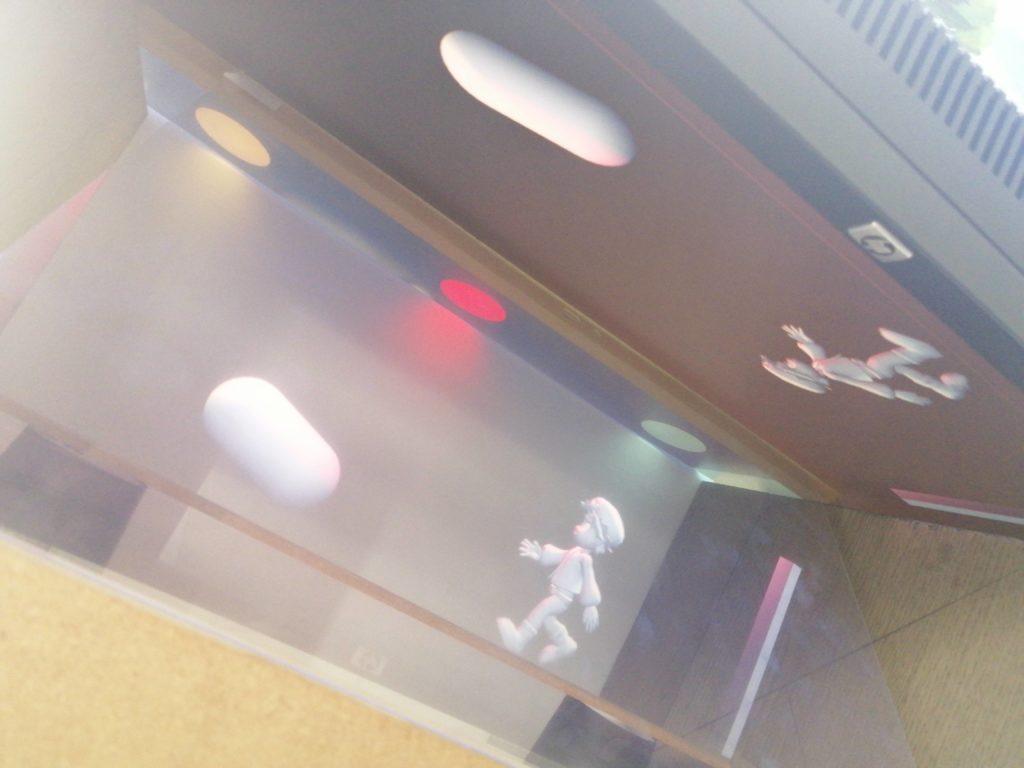
The setup was built ‘peep-box‘ style in order to effectively use the Pepper’s Ghost effect. In a Peppers Ghost setup, the character is best able to move along the surface of the screen: along a single 2-dimensional plane parallel to the peppers ghost’ horizontal axis. We can get some some faking of depth into the third dimension (the Z axis) because of everything except the digital character being in 3 dimensions. When scaling the digital content up or down, we are generating the illusion of movement on the Z axis and thus giving ourselves some play area within the given constraints of the physical box. While doing this, you will still have to take into account the occlusion by objects around the screen. As this depends on the viewing angle of the player it takes some trial and error to make it work effectively.
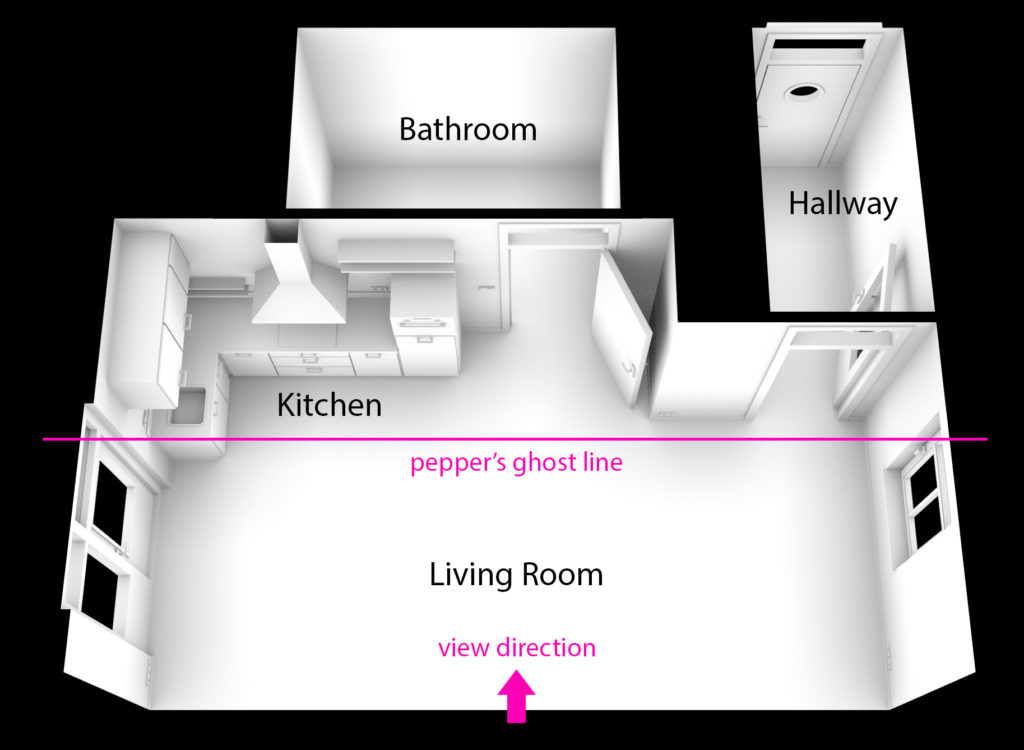
Because of the peep box style setup we needed to place all elements and rooms of the apartment next to each other, which you wouldn’t do when building fully digital. For the same reason we chose to go for a single-room apartment, with the bathroom and the hallway the only other rooms. Those rooms are only used by the character in certain circumstances, most of the action is located in the living room. This meant that the apartment layout is not realistic, but actually almost 1-dimensional.
Controls and UI
A project that would be fully digital would have a separate controller, either a mouse or gamepad. As our box was designed to be fully digital as well as mixed-reality, we chose to have the same button interface in the digital version as in the physical version.
In this way we tried to mimic the physical box experience as much as possible, so the frame/interface of the physical box & its buttons where literally translated to the digital version. Even if you as a player are using a mouse controller, you would still push virtual, ‘physical‘ buttons. This would still (indirectly) give the feel of really interacting with a miniature world in a doll-like house setup.
When testing the digital overlays like UI in the physical box, it quickly became apparent that for the Pepper’s Ghost effect to work properly, certain aspects needed to be exaggerated compared to a fully digital version. For visibility, the icons that denote the needs of the character were made much larger and with thicker lines than we did later in the digital version.
Character design
In the digital version everything had to become more subtle that way. While creating the digital version from the basis of the mixed-reality setup, we discovered that the character style we had developed for overlaying the physical environment did not match the fully digital environment style at all.
On one hand, this is because of the fact that the 3d model of the character we used for the Pepper’s Ghost effect was very basic, based on a crude block-out. This was done because this resulted in the best visual readability in the physical box.
On the other hand, as in the mixed reality setup the character is small and transparent, the expressions and movements had to be exaggerated to be clearly readable to the player. When transitioning to the fully digital environment, these exaggerations came across as too cartoony and overacted. We found that people could no longer connect with the character on an emotional level any more as well.
At this point we could have put a lot of time and effort into adjusting the environment and the assets to match the cartoony style of the character. Instead, decided to completely replace the character with a more emotionally immersive one that would also fit the modelled environment. That second route to us was the obvious choice, as it would take way less time and generate a relatable and attractive character that would fit the needs of a digital version. In the end we used a concept model that we developed into the 3d model.
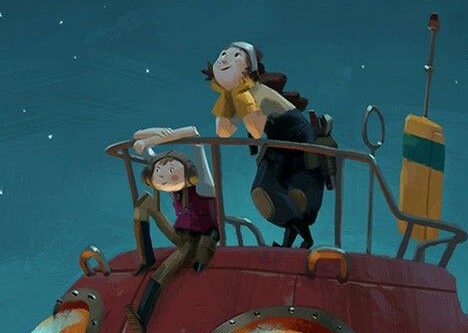
Cartoon-style character used in the mixed-reality version
More realistic character for the fully digital version
This post is part of a series we wrote after wrapping up the IRIS project.
When the IRIS-box project started, we aimed at developing a mixed-reality box and intended to design both the physical and digital components in parallel. Then we hit the Coronavirus lockdown-measures. This meant a couple of things for our design process, as we couldn’t…
…collaborate on the physical box in person
…playtest a physical box with the target audience
…show a prototype to our project partners.
We had to make a decision on how to continue the project. As it was unclear how the situation would develop, we chose to assume that the duration of the lockdown would be longer than the project itself. We therefore switched to a fully digital representation of the physical box. Still with the intent to move to a mixed-reality setup when possible and before the end of the project. In this way we could worry about the development of the physical components later, but would still be able to playtest with the target audience by sharing the digital version online. It also meant that we could show a fully digital prototype to the project partners, that would still give a pretty good approximation of the final product.
Moving to fully digital
During further development the digital version developed into a complete branche of the project, a digital twin of the physical object. Due to the success of the digital version and the prolonged lockdown measures, the digital version became a deliverable in its own right. It existed in the project alongside the physical version, instead of being just a digital derivative.
As mentioned, one of the biggest advantages of the fully digital version was that we could very easily share it with our target audience.
While building the fully digital version, we were able to quickly implement some designs that might not have come up in the physical development. Like the TV being on, switchable lighting inside the room and ambient lighting from outside falling into the apartment and emphasizing the day/night cycle. Some of these elements, like the TV being switched on, is definitely a bridge too far for the physical box. The fidelity of a fully 3D-rendered digital version can not be matched with the Pepper’s Ghost technology. We believe we squeezed out every bit of technological possibility we could.
Even when we went fully digital for our intermediate iterations, we still kept the physical box in mind. Ideally, the digital version should still reflect what the clients can expect from the physical experience. So keeping a close check with the actual physical box in mind is crucial. In the way we designed it, it should in theory not be a problem for players to switch from an online digital version to the physical mixed-reality box since all elements match 1:1.
For a previous project a generative music system was implemented in Unity featuring rich sounding ensemble strings based on PADSynth. PADsynth is an algorithm designed by Nasca Octavian Paul that generates complex wavetables by varying the width of harmonics in the frequency spectrum, and using the Inverse Fast Fourier Transform (IFFT) to convert it to a time domain audio signal.
The general idea behind the PADSynth algorithm is that complex sounding ensembles are the result of randomized phases and Gaussian distributions in harmonic content. If this sounds a bit abstract you could think of it as this: in an acoustic string ensemble all instruments ever so slightly out-of-tune because of small variations in instrument materials, dimensions, tuning, age, et cetera. There variations become more pronounced in higher frequency content. By widening the bandwidth of higher frequency harmonic content one can create airy pads or choir wavetables.
Below are two clips recorded from the PADSynth implementation in Unity.
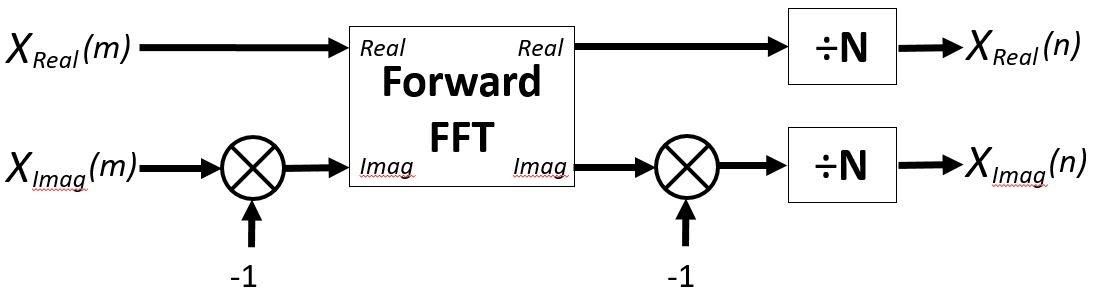
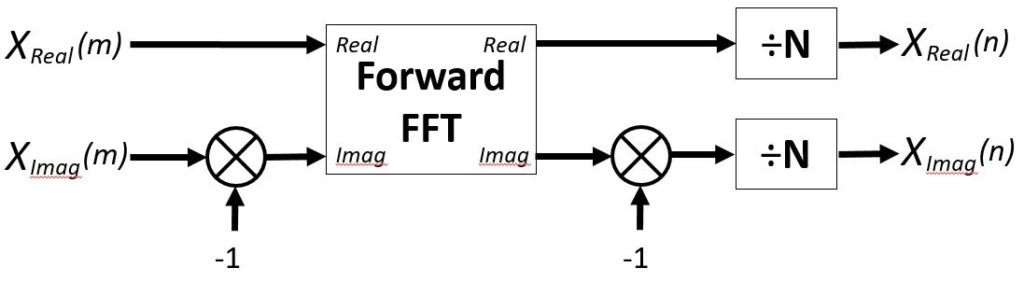
The need for an Inverse Fast Fourier Transform (IFFT) comes into play when converting frequency domain content to time domain content. Unity affords an FFT operation which converts time domain audio to a frequency domain spectrum data on an AudioSource through the method GetSpectrumData, however it doesn’t afford a method that does the inverse: convert spectrum data back to a time domain audio signal.
There are some very powerful FFT libraries available such as FFTW (Frigo & Johnson 2003) that afford performance optimized IFFT, however they’re a bit of a hassle to use with a Unity project unless you’re using a C# wrapper such as Szalay’s FFTWSharp(2015). For the purpose of getting intimately familiar with FFT/IFFT and in the spirit of Open Science the choice was made to write a custom C# script.
This results in a real-valued time signal so the imaginary part can be discarded, hence in the C# implementation below there’s no second inversion of the imaginary part and only the real part is normalized and returned.
Below you can find the IFFT algorithm implementation used for the PADSynth test in Unity, arrays real and imag are assumed to have the exact same length.
public float[] GetSamplesFromSpectrum(float[] real,float[] imag){
uint windowSize =(uint)real.Length;
uint n = windowSize;
uint j = n /2;float temp;for(uint i =1; i < windowSize -2; i++){
imag[i]=-imag[i];if(i < j){
temp = real[j];
real[j]= real[i];
real[i]= temp;
temp = imag[j];
imag[j]= imag[i];
imag[i]= temp;}
uint k = windowSize >>1;while(k <= j){
j -= k;
k >>=1;}
j += k;}
uint windowEnd =1;
uint bitCount =(uint)Mathf.Log(windowSize,2);for(uint lp =0; lp < bitCount; lp++){float re =1.0f;float im =0.0f;float c = Mathf.Cos(Mathf.PI / windowEnd);float s =-Mathf.Sin(Mathf.PI / windowEnd);float tsr, tsi;for(j =0; j < windowEnd; j++){for(uint i = j; i < n; i += windowEnd *2){
uint k = i + windowEnd;
tsr = real[k]* re - imag[k]* im;
tsi = real[k]* im + imag[k]* re;
real[k]= real[i]- tsr;
imag[k]= imag[i]- tsi;
real[i]= real[i]+ tsr;
imag[i]= imag[i]+ tsi;}
tsr = re;
re = tsr * c - im * s;
im = tsr * s + im * c;}
windowEnd <<=1;}for(uint i =0; i < n; i++){
real[i]= real[i]/ n;}return real;}
The code wasn’t thoroughly tested but it produced the intended results for the PADSynth implementation. It’s made available under the Creative Commons CC0 1.0 Universal Public Domain Dedication. https://creativecommons.org/publicdomain/zero/1.0/.
References Frigo, M., Johnson, S. (2003). FFTW. Massachusetts Institute of Technology. [Available here]
Lyons, R. (2015). Four Ways to Compute an Inverse FFT Using the Forward FFT Algorithm. DSP Related. [Available here]
Nasca, P. (2011). Padsynth Sound Synthesis Algorithm. Studia Universitatis Babes-Bolyai, Informatica [Available here]
Szalay, T. (2015). FFTWSharp. GitHub. [Available here]
Game design has broad application as design discipline because it must consider the design of underlying systems, interaction with those systems, and must approach everything with design thinking. The purpose of this post is to share insights into the game system design behind the Kanaleneiland box. Keep in mind that the perspectives on our approach have a basis in game design thinking.
System Design Goals
In our
approach, we use design goals to focus on results and avoid technology-driven
features. Design goals are demonstratable player results driven by a
combination of the system, interaction, medium, et.
Our
design goals for the Kanaleneiland box was to:
Communicate
the benefits of Bo-Ex upgrades in cost.
Allow
children in group 7-8 can play and learn about green energy.
Communicate
how Bo-Ex upgrades will affect the Kanaleneiland resident’s cost of living.
The second draft of the system flow diagram
The System Breakdown
The formal elements of a game system include time, game space, agency, objects, attributes, rules, objectives, game state, and incentives.
Formal Elements of a Game System M. Hrehovcsik, 2011
Time
The time of a single session is 210 seconds divided into three days and two nights and ends with a paused feedback moment. Starting a new session begins with the game state fro the previous session. The design assumes that players will play multiple sessions and estimates that a typical player will play three or more sessions, i.e., about 10 to 15 minutes, before arriving at a meaningful play experience.
Game Space
Space includes the Kanaleneiland box and screen that displays the hologram effect, a.k.a. Pepper’s ghost. The system space consists of the physical control interface, the physical space in the Kanaleneiland box, and the digital space. The HUD (heads-up display) and the declarative layer consisting of the character separate the digital space. The digital area provides the most amount of real-estate to the character, which invites players to take action and undergo actions in response to the player.
Agency
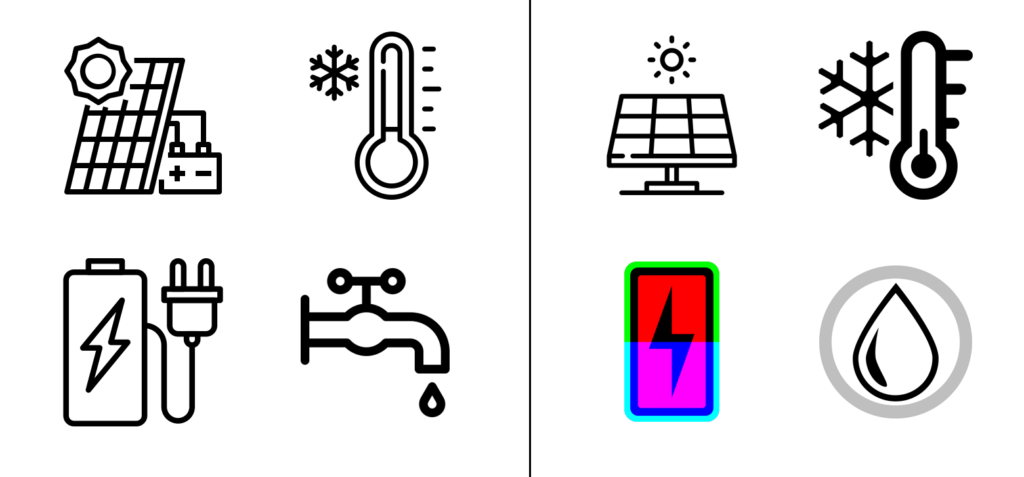
Seven binary setting buttons and a turn-nob determine the player agency. The buttons are organized into two groups 1) core activities; 2) Bo-Ex upgrades. The turn-nob controls the temperature. The core activities allow the player to switch on/off lights, turn on/off the stove, plug-in/out a mobile device, and use hot water. Bo-Ex upgrades allow the players:
switch to solar power;
switch to USB plugs;
change the stove to electric;
\use a Toon (i.e., digital thermostat) to regulate temperature;
install double glass to minimal temperature regulation;
and switch all Bo-ex upgrades on/off altogether.
Objects and Attributes
The system considers the stove, shower, lights, thermostat, and charging. All these objects have a cost attribute, gas or electricity attribute, or temperature attribute. When the Bo-Ex upgrades are applied, they primarily affect the attributes by slowing down costs, changing gas to electric, or slowing the rate of the temperature change.
Game State Feedback
The player can interpret the game state by 1) monitoring the accumulative costs displayed by the HUD; 2) during the paused end-session feedback screen(s). The later provides the most in-depth insight into the game state by giving the player with varying degrees of feedback. The primary game state indicator is an aggregated grade between A+ to D, which indicates how well the player balanced the character’s needs and cost of utilities during the previous session. Additionally, individual elements that affect the character’s quality of life are also graded A+ to D to provide further details. The next level of feedback offers an overview of the costs of gas, heating, and electricity. The summary also includes the cost of rent, which never changes. Including the cost of rent demonstrates to the player that Bo-ex upgrades do not increase the rent. The last level of feedback provides an overview of previous game states in terms of final grade and costs.
System Rules
The system has specific rules to handle the grades given to the player. These rules challenge the player to find the balance between costs and the quality of the character’s life. The system primarily relies on a simplified simulation based on thermal dynamics.
Social Rules
Because the Box’s interface has multiple interaction points, two people can play at the same time without conflict over the agency.
Incentives The system is designed as a sandbox experience. The sessions allow players to experiment without consequence. While the game state feedback encourages the player to find the optimal configurations.
A system for gaming or playing
“A game is a synthetic procedural system that stimulates regulated play.” – M. Hrehovcsik, 2010
What is the Kanaleneiland box? Is it a game? An argument for this system being a game is that it grades the player’s result from each session. The grading is a clear indication of how well the player played the game. However, because after each session, the game state remains persistent, i.e., never resets. Because the system it never resets, it misses a recognizable end-state. Many game definitions include the end-state as a requirement for a game. Others only indicate there needs to be a quantifiable outcome. The Kanaleneiland box system becomes a compelling case for thinking about what makes a game. In this post, the formal elements of a game system are used to analyze the Kanaleneiland box system. Based on the breakdown alone, a game system is recognizable. However, the results could still be labeled by some as a simulation or toy.
When executed well the illusion of Pepper’s Ghost continues to impress, even in the light of recent improvements in AR. However, because of the boundaries between the physical and the virtual realities Pepper’s Ghost images tend to look superimposed in a very artificial way. One way to create more cohesion between the physical and digital is to add uniform lighting.
How scene lighting, projection and a physical model of an apartment can come together to create a scene.
So for a project we’re currently working on we wanted to mix physical and digital space to create an arcade-like interactive box. One of the more simple ways to essentially create a hologram that’s placed inside a physically built environment using a technique known as Pepper’s Ghost.
What’s a Pepper’s Ghost?
Pepper’s Ghost is an illusion technique named after English scientist John Henry Pepper. It used a flat sheet of glass that’s ideally invisible to the viewer to project a ghostly version of a scene or image on the other side of the glass.
So, our way of utilising this technique is essentially pretty simple. We built a box without a top and an opening in the side to look into. Then we use a computer monitor and lay it on top of the box, the screen facing down into the box. Then we place a transparent and reflective plate in the box at a 45 degree angle to the screen to project the images displayed on the monitor into the physical space. At it’s core, there isn’t much more to it than that!
It’s basically just a box, a monitor and a plate of glass!
One interesting thing about this technique is that anything you project this way is placed on a specific plane. This plane starts at the intersection point of the glass plate and the monitor screen and goes straight down as long as the plate is placed properly at 45 degrees.
We want to place this projection plane somewhere in the middle of the room to create depth. The box had to go deeper than the projection plane. In our case. That meant we didn’t use about a third of the monitor for the projection, so we decided to use it in a different way.
Dynamically lighting the scene
A clear example how we can use the part of the screen that isn’t projecting for dynamic scene lighting
We can use the part of the screen that isn’t projecting to light the back of the box in whatever way we want. Because it’s just a monitor we can change the color, strength and placement of the light dynamically. Both the lighting of the space and the projection are digital in this case. This means we can relatively easily create cohersion between the physical space and the digital projection by having the lights dynamically influence the projected models or characters.
Here you can see how the 3D models being projected are influenced by the moving lights behind it.
Masking and other clever tricks
Mixing the physical and the digital elements of the box is key to create cohersion between the two. To do this we want the digital to be aware of the physical in more ways than just “lighting”.
To try to do this, we can make the illusion the projection moves behind and inside of things:
Two things are used in this case: masking and the physical object’s position in comparison to the projection.
To create the idea the character is walking behind the blue cube, we digitally mask the projection to appear black when the character moves there. The projection normally appears on top of everything, so it won’t be perfect, but it creates the right idea.
By putting a physical object on the projection plane, but still letting it appear, it will look like the character is inside the physical object, as if it were a separate room.
Things to keep in mind
I think there’s a lot of potential in this technique, but there’s a few challenges that are important to keep in mind. The main one here is that the effect starts to fade if there is too much external light coming in. In our experiments it still worked fine in an averagely lit room, but if it’s in direct sunlight the projection won’t show up.
The same goes for contrasting lighting or colors in the background of the projection. Too much contrast directly behind a projected image makes the fact that it’s always a little see-through very clear.
In three easy steps you can build, upload and embed your Unity project to be playable online.
Unity used to support a Unity Player plugin for internet browsers, however, using the iframe widget it’s easier than ever to make your game publicly available on the internet without imposing unnecessary hurdles. Follow these three steps to embed your Unity project in HTML based websites.
Step 1: build for WebGL
Open the Build Settings window (File -> Build Settings), select “WebG:” from the list of platforms and if necessary refer to the WebGL project documentation for recommended build settings.
Unity conveniently creates an index.html document for you that loads the game.
Step 2: upload your WebGL build
Upload the build consisting of an index.html document and two folders named “build” and “templateData” to a new folder on a public server. If you are new to FTP Servers, download Filezilla and login to your server to upload files.
For example, we uploaded one of our pilot projects to www.innovatiestudio.hku.nl/LEC_WebGL/
Should you paste the URL in your webbrowser it should already load and run the Unity project as long as WebGL is supported by your browser ( Chrome, Firefox, Internet Explorer, Opera, and Safari are known to have good WebGL support).
Step 3: insert HTML code in your website
To embed the Unity project into your website you need to insert an iframe tag into HTML code, alternatively when using WordPress you can add HTML for text formatting.
Using the iframe-tag you can embed another document inside the document you’re working in, so this way you could just embed the index.html document that Unity generated inside your website. To do this copy the HTML quote below, paste it into your HTML document and change the “src” attribute to the path of your own Unity build.
For example, this is the HTML script used to embed the pilot project into the InnovatieStudio WordPress website:
To preserve the indended dislay ratio it’s generally a good idea to copy the width and height parameters from the index.hrml document that came with the build.
You can find an example of an embedded Unity Player in our Treetale post.
References: Arango, Ricardo (2016). How Can I Make The Canvas Transparent On WebGL? Unity. [Available here].
Unity Documentation (2019). Building and running a WebGL project. Unity. [Available here]
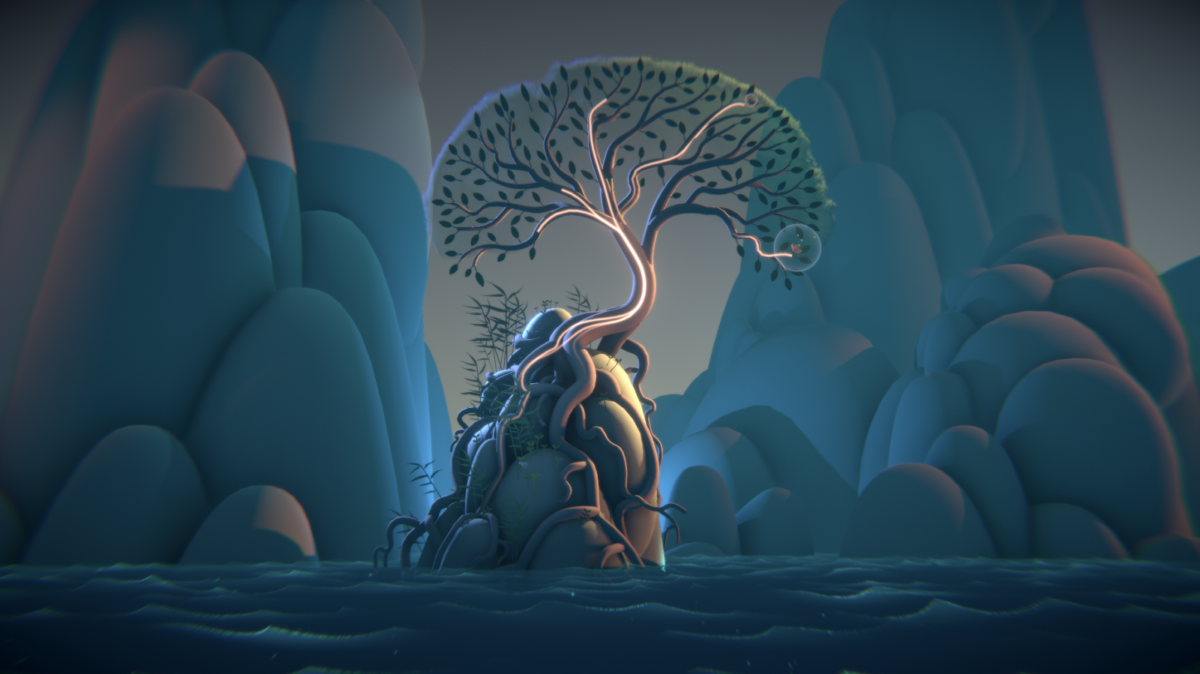
In a previous post, we highlighted how to embed your Unity Projects inside a WordPress post, so here is a playable example of one of our projects called Treetale. Treetale is an interactive application that lets people who are in their final phase of their life share their thoughts with family and friends to reconnect or create a memoriam, or let’s them reflect on their own thoughts:
In this feature film, the characters, the environments are great examples in expressing how the human state of consciousness of the Blade Runner world has shaped its own habitat. As an example I’ll explore the ‘Niander Wallace’ office building in an attempt to reveal the deeper symbolic structure that lies beneath, how it is presented & what design principles are used to accomplish this expression. For the environment is not only expressing / mirroring the psychological makeup of the inner self of its owner & his place in the world, but it is also expressing his place within the hierarchy on cosmological scale which is rudimentary part of any good story which explores the human condition.
Niander Wallace
was a scientist, replicant manufacturer, technologist and the founding CEO of the replicant manufacturing company, Wallace Corporation.
Symbolically refers to being blind for the ‘natural’ state of being or the natural world. He can therefor only ‘see’, ‘view’ & ‘interpret’ the world through artificial eyes. This is symbolically presented by hovering fishlike drones equipped with technical camera lenses which serve as his eyes to the world. This symbolic ‘blindness’ for the natural world is THE main reason why Wallace is not able to find & unlock the last piece in the puzzle of creating life itself; fertility, which resides in the domain of the natural world which he can not perceive. That is why his artificial creations remain barren & sterile, not able to reproduce themselves. He must therefore track down and get hold of Rachel & Deckard’s hybrid miracle child; the bridge between the ‘artificial’ & ‘natural’ world.
example of the ‘fishlike’ camera drones
The name ‘Niander’ refers to ‘Neander’ which means: New Man. So the name reflects Niander Wallace’s intentions & grand vision of creating a new- yet synthetic composed human being, by means of dethroning God as creator of the natural composed ‘Man’. To accomplish his ultimate goal he must ‘conquer’, ‘unlock’ the last stronghold, the entrance to the garden of Eden; the seat of life itself which resides in the womb of the natural woman. All this in order to finally wield the power of making his sterile creations fertile so they can populate the universe.
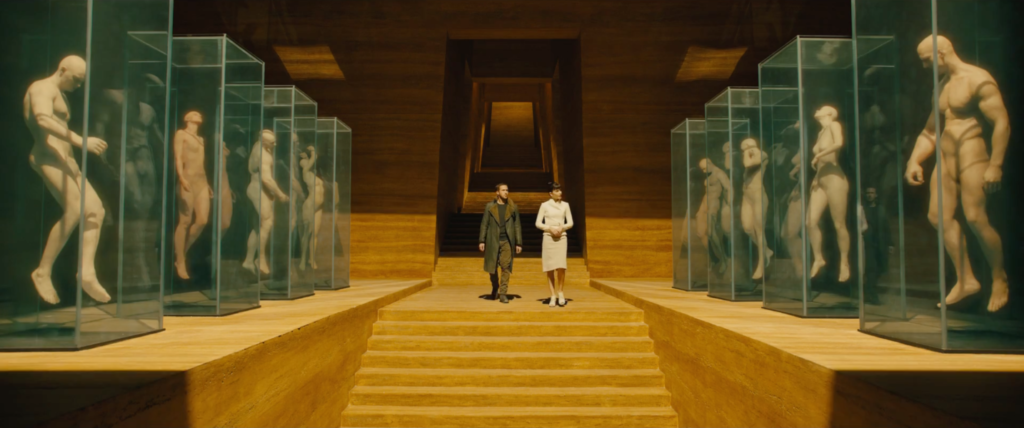
Side note: In today’s world we often interpret the word ‘Man’ for as being the masculine part of humanity. However from its original linguistic meaning, it is a plural word incorporating both male & female. Above a picture of entering the synthetic ‘womb’ of Niander Wallace’s residence displaying a lineup of various models of his artificially created humans.
The ‘Wallace’ Building
Interior Design Language
Introduction
To understand the fundamental design language of the Wallace building interior designs & structure, it’s important to be aware of the underlying symbolic cosmology in which the world of Blade Runner is set. The world of Wallace is manifesting itself by being the artificial counterpart or mirror of the natural world. So to give some concrete examples on how this plays out in terms of design choices:
The ‘Womb’
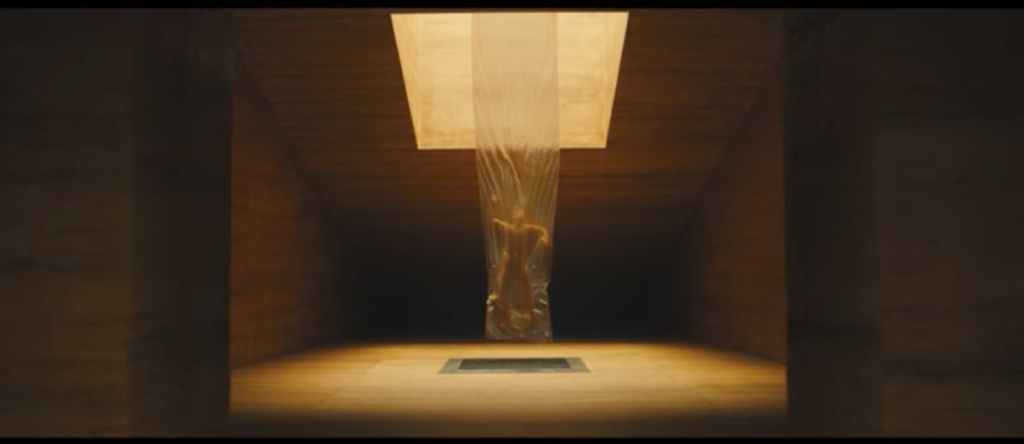
Within the cosmological structure of the natural world, creation of life is represented by the coming together of spirit & body, (heaven & earth). This through conception, nourishment & birth of a child in the womb of the female. Symbolically speaking, the seed from the man is the ‘spirit’ which is instilled in the women’s womb or in other words; is fused with ‘matter’ the earth. Being the counterpart / mirror of this natural world, Wallace’s artificial creation of life therefore must use the same analogies to match the cosmological structure. How this is expressed in the interior design can be seen in below picture of the ‘birth chamber’:
Also notice how the ‘artificial’ use of materials are evident counterparts of the ‘natural’ world (use of stone, plastic, etc.)
The sterile square ceiling opening; mimics the organic private female body part.
The light shining down from the opening; refers to & mimics the divine womb, where life is conceived & nourished.
The sterile plastic & transparent shaft; mimics the organic female birth canal.
The square spot on the floor; mimics & marks the ‘space’ the child will inhabit when entering the reality of the natural outside world.
Use of Color
The yellowish color pallet in the Wallace ‘Womb’ space is clearly used as a design element to express ‘artificiality’ throughout the whole film. Consequently therefore the interior spaces in the Wallace building complex are all lit with these yellow color tones to support consistency in the film’s symbolic narrative. The natural world counterpart is expressed with the color green, which is also consistently and purposefully used throughout the film to underline the symbolic meaning. Here an example picture:
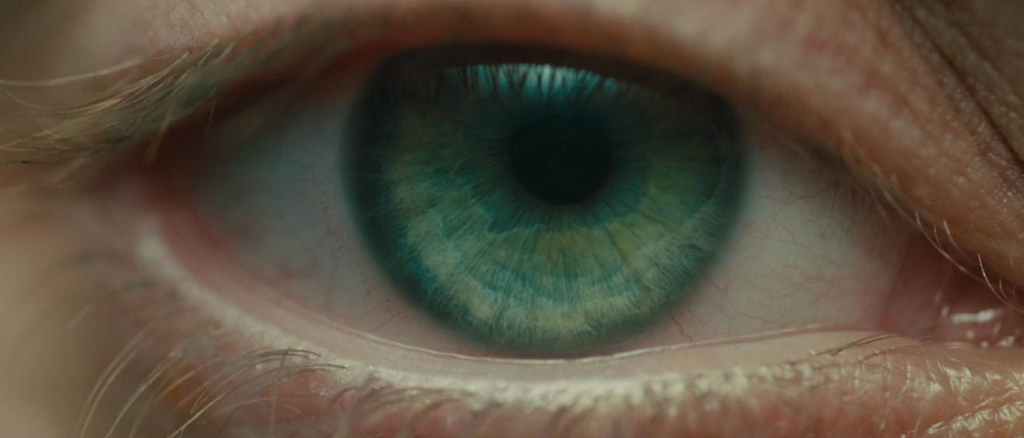
Like in the first Blade Runner movie, the film opens with a close up shot featuring a green colored eye, which again refers to the natural world looking into a world which has taken over or being saturated by artifice.
The ‘Heaven’ realm
The place where the ‘Creator God’ & its ‘Angels’ reside. Which again are analogies to the cosmological structure of the natural world which also must be expressed in the artificial counterpart / mirror world of Wallace. As in the natural world, the heaven realm has a strong hierarchical structure which consolidates order of importance, divine power, providence & ranking.
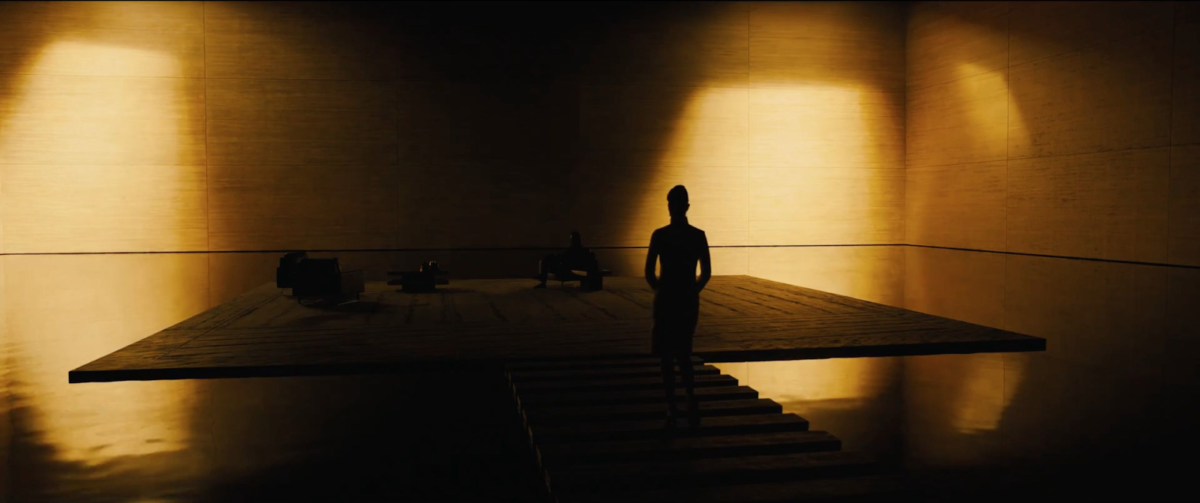
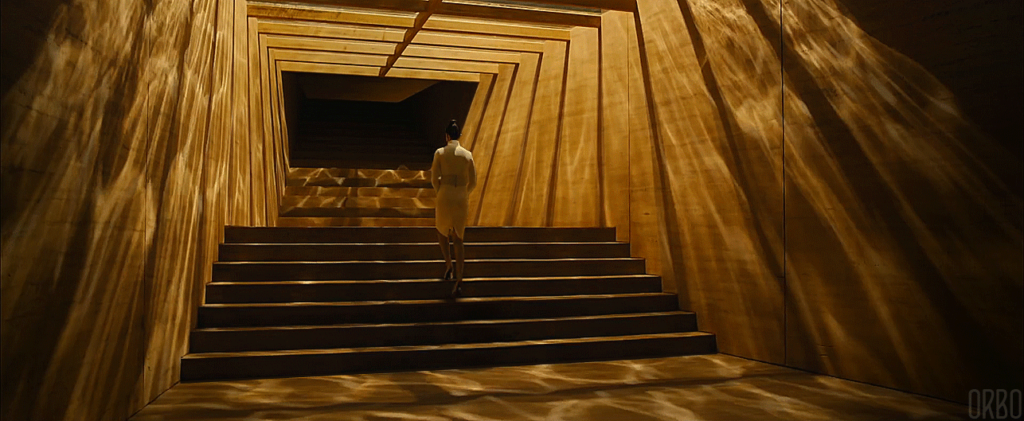
The ‘Throne Room’ island, above the water
Stairs leading up to the ‘Throne Room’, below the water
‘Office Spaces’, below the water
In the middle picture we see one of the hallways leading to the office spaces & Wallace his ‘throne room’. Again the spaces are square, abstract & sterile in shape & compositional language which contrasts the organic natural world. Notice how the hierarchical cosmological structure of higher to lower order is expressed in going up & down the stairs leading to the throne room, which indicates Wallace’s ranking position within the order; he is the prime creator so his residence is the highest placed room within the total structure.
But that is just one of the many elements the designers used to firmly underline this symbolic cosmological order. The island on which the throne room is set, is placed ‘above’ the waterline & the other spaces are situated ‘below’ the waterline which marks the order of divinity & power in opposition to Wallace’s slave ‘angels’.
Also notice the caustic lighting effects in the lower office rooms is a reminder to support this notion of hierarchical structure of cosmological spaces. But also again underlining the ‘womb’ idea where artificial life is being generated.
But that’s not all; this notion of ‘above’ water & ‘below’ water has strong roots in ancient cosmology. If we dig deeper and frame a picture of a symbolic hierarchical structure of the cosmos, we could get something in the likes of this:
From above cosmic construct we could say that the ‘realm’ in which Wallace dwells is actually not ‘heaven’ or the highest form of ‘order’ but a place right between ‘order & chaos’, ‘semi-light’ & ‘semi-dark’, ‘gas & fluid’, ‘air & water’, etc. His ‘placement’ on the cosmological scale therefore actually makes perfect sense if we take into account what we talked about earlier, of him being a twilight person; very perceptive to the artificial world but blinded to the natural world. Which makes him unable to enter or conquer the Eden / heaven of the natural world. Or in other words, despite his aspirations of being a God, he remains ‘human’.
Though, there is still another interesting thing about the use of water as a symbolic design element in the Wallace building interior designs. If we study the ranking of different natural elements in the scale, we can see that it goes from fully ‘solid’ to fully ‘transparent’. Spiritually speaking, it indicates that the higher you travel on the scale, more will be revealed (enlightened), or the lesser your view is ‘obscured’ or ‘distorted’. So let’s draw an analogy to the office spaces below the water-line & see how that notion is expressed. Standing in the office space, looking upwards through the opening in the ceiling, the image we then see will be distorted by the refraction of the water. So Wallace’s ‘angels’ do not have access to the full ‘clear picture’ of his artificially created reality or heaven. So prohibition is enforced on autonomy, knowledge, self-determination, power, etc. This is only reserved / accessible to the ‘God’ of this twilight realm; Niander Wallace himself. However if we take his own ‘blinded’ spiritual constraint of perception/limitation into consideration and see how that is expressed in the throne room, we come to the following observations:
The island is situated just above the water-line, indicating that despite his genius abilities, brilliance & intelligence in artifice, he has barely managed to create ‘land’ to establish the 1st state of ‘order’. Because cosmologically speaking; only when spirit & matter meet, order can be established from chaos. This notion of order from chaos is symbolized & expressed by land rising from the water to build a house upon. So by artifice Wallace has gained dominion over artificial land & declared himself God over this land. But Wallace strives for a higher goal; to take over heaven by artifice; trying to bypass the natural order of the universe, creation of life & eventually God.
This cosmological notion of not yet having access to the natural Eden or heaven realm, is also expressed by the fact that the throne room is enclosed by stone slab; creating a kind of cave like environment. So even though Wallace considers his world as the artificial heaven, in its expression it is conveying more of an ‘underworld’ realm. Which is obscured & hiding from the natural heaven & its God. A dualistic symbolic notion of both rejection & protection; Wallace not able to reach the natural heaven because it is closed off from him by God, but yet also asif he is hiding from the natural world / heaven & needs protection to shield him from it.
This twilight dwelling between above & below, knowing & not knowing, order & chaos, etc., is also expressed by the constant shifting of light & shadow in the throne room. Which is again a strong symbolic reference to Wallace’s state of consciousness, his place on the cosmic hierarchical scale & the artificial reality of his world. On top of that, the caustic light is also shining from below the water-line, reflecting on the stone slab. Which again is a symbolic reminder of the fact that even though Wallace has managed to arise above the waters of chaos, still he has a distorted view on the higher realm of reality.
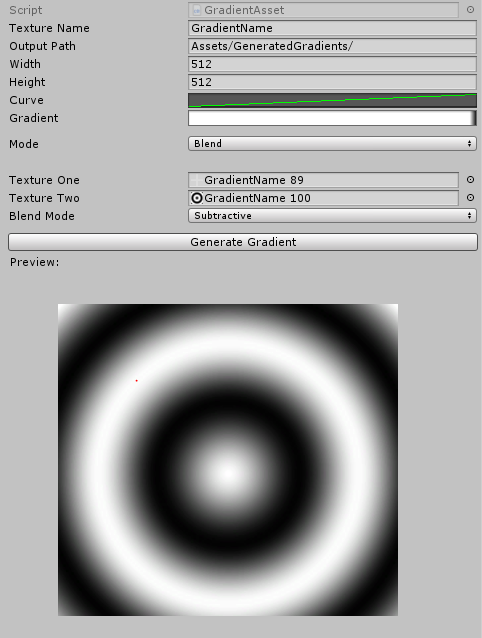
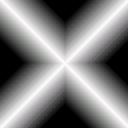
When working in Unity you might find yourself in need of a gradient texture. Of course you can go online and look for a good one, or open your favourite art software to create it yourself, but wouldn’t it be nice to just generate a gradient from inside Unity? So let’s see how this works!
The idea is to generate a texture based on an Animation Curve which samples colours from a gradient. In this way, you have full control of the final generated gradient. I integrated the following modes: Linear, Circular, Radial, Blend, Perlin Noise and Random Noise. The tool contains a preview section which shows immediate updates, if you are satisfied with the preview, you can click the Generate Gradient button and a texture asset will be added to your project.